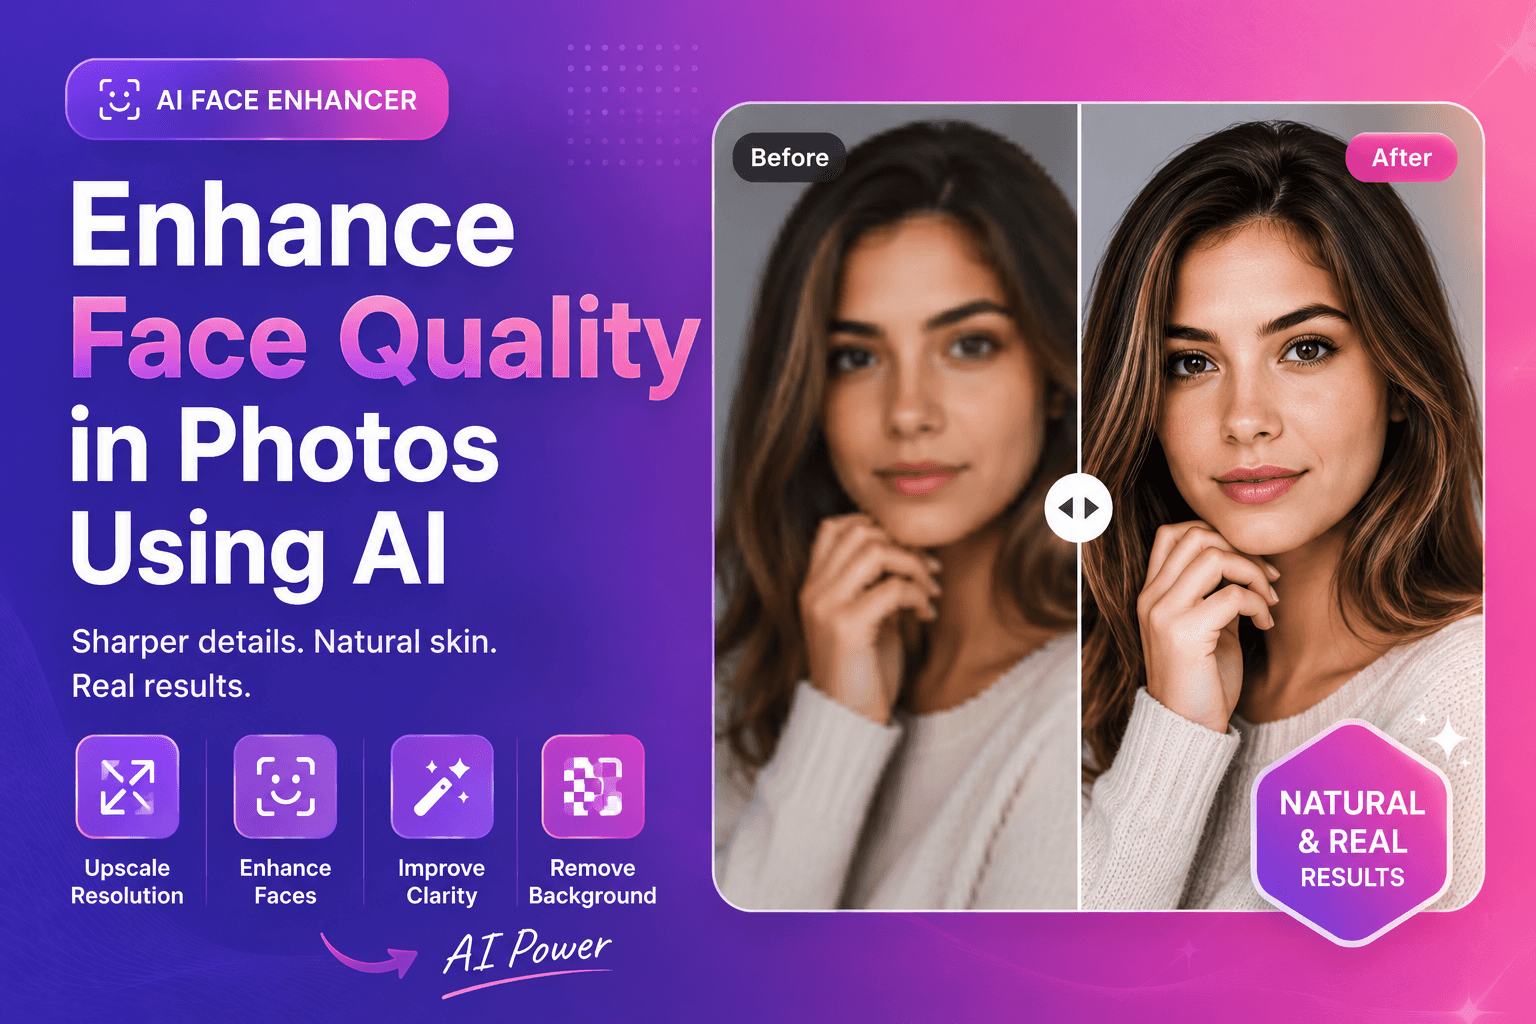
How to Enhance Face Quality in Photos Using AI
If you want to enhance face quality in photos using AI, you’re aiming for one thing: a clearer, more professional portrait that still looks like a real person. The biggest risk is overdoing it—too much smoothing and sharpening can turn a face into plastic.
This guide gives you a realistic, beginner-friendly workflow to improve face clarity for headshots, creator profiles, and team pages.
What “face quality” means (and what to avoid)
Face quality is not about perfect skin. It’s about:
- clear eyes and facial features
- natural skin texture (not “painted”)
- good contrast and lighting
- no harsh artifacts from compression
Featured snippet: best quick result
For most portraits:
- Upscale if the image is small
- Enhance faces with a face-focused tool
- Keep edits subtle and natural
Step-by-step: enhance face quality in photos using AI
1) Start with the highest-quality file you can
If you have options, choose:
- original camera file
- original upload (before social media compression)
- least compressed version
Avoid screenshots when possible.
2) Upscale first when the image is too small
Small portraits often look blurry because there aren’t enough pixels. Upscaling adds resolution so face enhancement has more detail to work with.
Try our image upscaler to increase resolution before face enhancement.
3) Enhance the face (subtle beats aggressive)
Now apply face enhancement:
- focus on clarity in eyes and key features
- avoid heavy smoothing
- check results at 100% zoom
For a natural upgrade, use our face enhancer and compare before/after at full resolution.
4) Clean the background (optional, but powerful)
Here’s a hidden hack: even if the face improvement is modest, a clean background makes the photo look more professional.
If the background is distracting, try our free AI background remover and place the portrait on a simple neutral background.
Best use cases (where face enhancement helps most)
- LinkedIn profile photos
- creator headshots for YouTube, TikTok, podcasts
- website “About” pages and team pages
- speaker bios and event profiles
- marketplace seller profiles
A simple face-enhancement checklist (featured snippet)
If you only remember one thing, remember this:
- Eyes first: clarity in eyes matters more than skin smoothing
- Keep texture: avoid “painted” or waxy skin
- Fix resolution: upscale small images before enhancing
- Check realism: compare at 100% zoom before exporting
Common problems and fixes
Problem: the face looks waxy
Cause: too much smoothing.
Fix: reduce enhancement intensity, keep texture visible, and avoid stacking multiple filters.
Problem: the eyes look unnatural
Cause: over-sharpening or “painted” detail.
Fix: choose a more natural result, or upscale first for better structure.
Problem: the image is blurry (motion blur)
Cause: movement during capture.
Fix: AI can improve clarity a bit, but strong motion blur is difficult. Use the best available file and keep expectations realistic.
Advanced tips (still beginner-friendly)
These small improvements can make face enhancement look much more natural.
H3: Improve lighting in the edit (without heavy filters)
If the face looks dull:
- increase brightness slightly
- lift shadows carefully (don’t wash out the face)
- avoid extreme contrast (it can create harsh edges)
H3: Watch the background for “sharpness illusion”
A busy background makes faces look softer. Even a mild background cleanup can make the portrait feel sharper.
If the backdrop is distracting, try our free AI background remover and place the portrait on a simple neutral background. This often improves perceived quality more than extra sharpening.
H3: Don’t forget export settings
Export choices can ruin a good face enhancement:
- avoid re-exporting JPEG multiple times
- keep quality high for the final export
- resize to the platform’s actual display size before compressing
If you need to learn file type trade-offs quickly, this MDN guide is the clearest reference:
MDN: Image file types and formats
Pro tips for better portraits (even before editing)
You’ll get better results if the original photo is decent:
- Face a window for soft light
- Avoid overhead lighting that creates eye shadows
- Keep the camera at eye level
- Use a simple background when possible
H3: quick color and contrast sanity check
Before exporting, check:
- skin tone looks natural (not orange/gray)
- highlights aren’t blown out
- shadows aren’t crushing facial detail
Featured snippet: best order of operations
Upscale → face enhance → background remove (optional) → resize → export
That order prevents artifacts and keeps the face realistic.
External resources (authority)
For image basics that also affect portraits:
- MDN: Image file types and formats
- web.dev: Image performance issues
- Google Search Central: Image SEO basics
FAQs
Can AI enhance face quality without making it look fake?
Yes—if you keep it subtle, start from a decent image, and avoid stacking heavy filters.
Should I upscale before enhancing faces?
If the image is small or soft, yes. Upscaling helps the enhancer work with more pixels.
Does face enhancement work on group photos?
It can, but results vary depending on resolution and how big the faces are in the frame.
Can I remove the background after enhancing the face?
Yes. Background removal often looks cleaner after you’ve improved clarity.
What is the best format for portrait exports?
JPEG or WebP is common for photos. Use PNG if you need transparency.
CTA: Try ImgifyTools for free
Ready to improve your portrait?
- Enhance your photo with our face enhancer for natural clarity
- Use our image upscaler if your file is low resolution
- Try our free AI background remover for a clean, professional background
Upload your image now and see results instantly.
Conclusion
To enhance face quality in photos using AI, focus on realism. Start with the best file, upscale when needed, use face enhancement gently, and clean the background when it helps. With a simple workflow, you can upgrade portraits for professional use—without the “AI filter” look that reduces trust.
You may also like
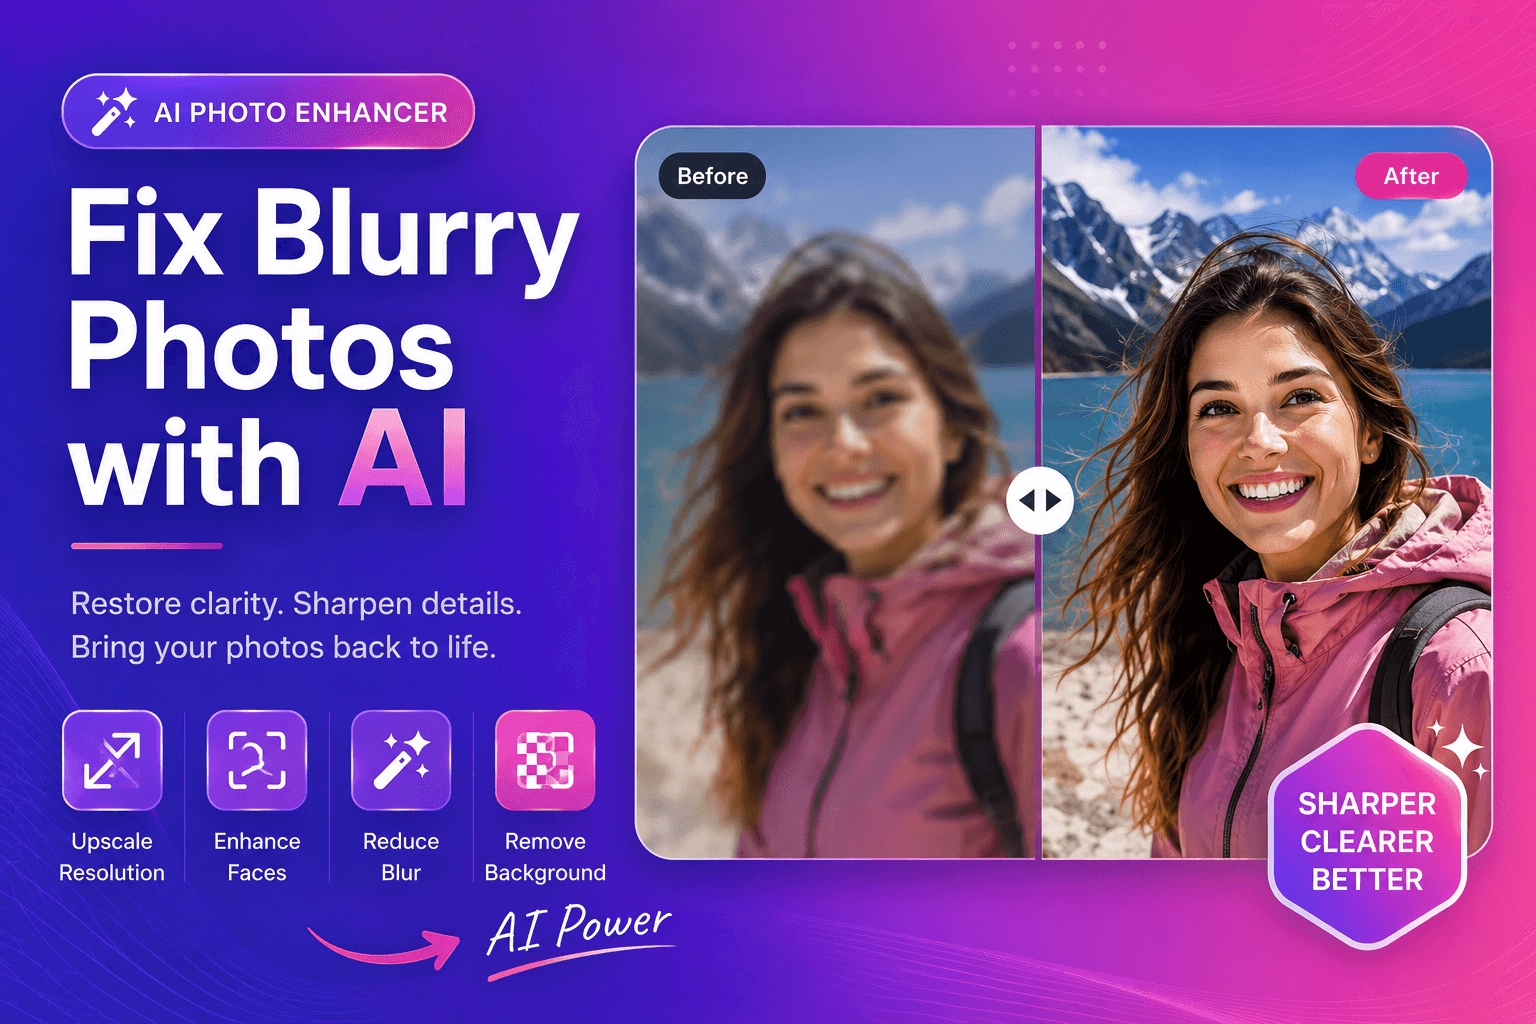
Fix Blurry Photos with AI (Step-by-Step)
Fix blurry photos with AI using a simple workflow. Learn what blur types exist, how to improve clarity, and when upscaling and face enhancement help most.
Read next →

Remove Background from Image (Free AI Tool)
Remove background from an image in seconds. A simple AI guide for clean cutouts, transparent PNGs, and pro results—free with ImgifyTools.
Read next →